All screenshots can be selected and clicked to see a larger image.
The starting position on Mar-Apr 1940:
The option card also allows the Axis to declare war immediately on a Neutral Country, so long as that country is reachable by the Axis this turn (the conditions are more specific, but that's the general gist of it). Clearly, the target will be DN so as to not give the Brits a chance to get their units into the country. The Axis
Moving through the steps given on the option card, first the Axis Declares War, which results in the DN forces being set up after determining who controls the country. Since there is no Soviet faction in this scenario, that means it's the Western Allies, who place the country marker and the 0-1-2 Res infantry unit in their force pool. Since that's the only unit for that country, no units are placed on the map. DN is now an Activated Western Minor Country.
[Edit: The Axis actually choose between Delclaring War and rolling on the Diplomatic Incident Table. Since Declaring War is the logical step in this sequence for the Axis, and since the Diplomatic Incident Table roll I made ended up with no result, this worked out for the purposes of the example, but it is important to note those two little words "one of' on the card text! My apologies for any confusion.]
Let's pretend for a minute that the Axis decided to roll on the Diplomatic Incident table instead, and gets a 3 - Coup d'Etat! This would be awesome except for the fact that the Allied Crusade is in the +1 box, so that means we subtract one from the total to get a result of Neutrality. Per 15.27, because there is no Influence or Neutrality marker in DN, one is placed in Oslo. Per 14.23, you only place a Neutrality marker in a Neutral country, so in this case nothing happens.
Note that the Option Card says to do all of this in the Option Card Segment rather than in the Political Events segment. This is good, because it means we can tailor the replacements the card gives us to the task of taking DN. Also note that because all of the events on the card are within the red box, they will only apply to this turn and will be ignored in the next turn. However, the Axis player does get a single Blitz counter to place in his Support Units box for use in both this turn and the next.
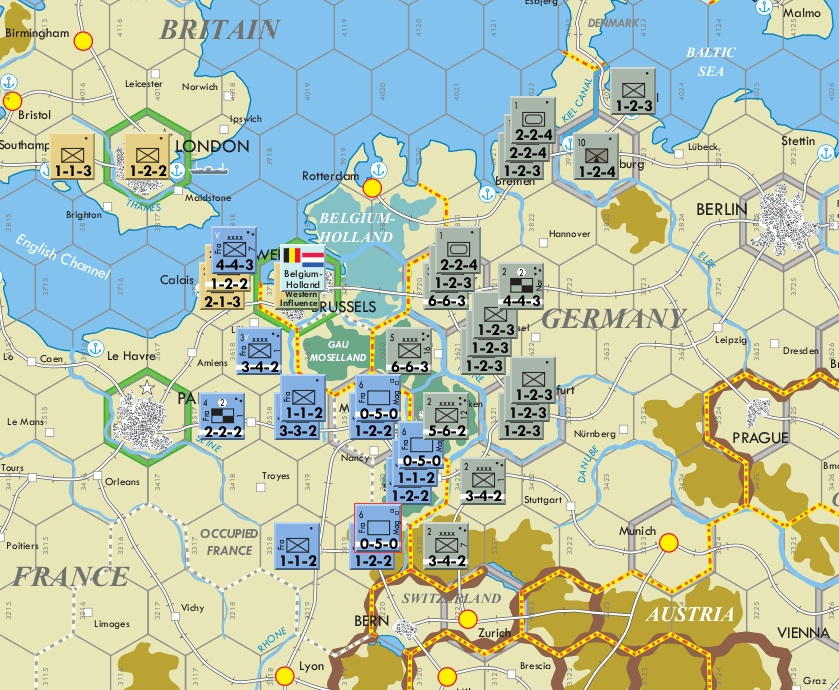
There is no Logistics or Partisan phase as the Axis don't have these markers in it's force pool, so it's on to replacements. The Axis gets one panzer and four infantry steps, but if he wants to bring on the airborne unit to invade Norway and it will cost two infantry steps. The following picture shows the board position at the end of the Seasonal Phase.

Next up is the Initial Admin Phase, which contains three segments. The first, the Political Events Segment, is skipped because there are no events listed for that segment on the Option Card. The second segment is the Support Segment, which we will spend a little time on.
Since there are no support units on the board to be removed, and no beachheads, we skip the first two steps in this segment and go straight to the support unit placement.
[Edit: I made a major mistake in this section regarding the air units - they only cancel an open port if the hex is within three hexes of their own Naval Base, which is not the case here. In any event, the idea that the Axis needed to cancel open ports is not necessary for reasons that occur later. As such, I have revised this section tremendously. Please ignore the Naval Zone Box and what it contains going forward]. The Axis have five units in their support unit box - a Troop/Supply convoy, three Air Force units, and a Sub Fleet. The Sub Fleet has a downward pointing arrow behind the unit symbol, so that means it cannot contest a support unit placement.We have two choices - the Strategic Warfare box to allow our delay units to come back a bit faster, or the North Sea On Station box.
What exactly a successfully placed Sub Fleet would do for us takes a bit of digging. In order for a Convoy to transport a step, the destination port must be an Open Port. However, an enemy Fleet (of which the Sub Fleet qualifies) in the On Station box of that Naval Zone denies this status to the destination port. However, only the Sub Fleet will affect any Open Ports west of Rotterdam, and it can be easily countered by the Surface Fleet. Better to place the Sub Fleet in the Strategic Warfare box to threaten the advantage the Allies hold because of the Allied Crusade being in the +1 VP box on that track.
At this point, the Western faction has the opportunity to contest the Sub Fleet's placement, and has two choices of how to do it: their Home Surface Fleet or their 1st Air Force. Both can be placed as there is a Western Faction Naval Base in both Southampton and London. Note that because the units are British, the base must be British. The rules are a bit unclear as to whether or not Calais constitutes a British Naval Base, a French naval Base, or both (it has units of both nationalities), but it doesn't matter in this case The Brits decide to use their Surface Fleet to contest the placement of the German Sub Fleet, so both go to the Naval Warfare Delay Box immediately. Because they were removed due to contested support unit placement, they do not go to the normal Delay Box. The difference is that the NW Delay Box can result in a significantly longer delay before both are again available. The Brit decided not to use the air unit as they want it available for combat.
Now the Axis player has to decide if he wants to place any Air Force units, but there's no burning reason to do so. There's no reason for land combat this turn, as all the Axis wishes to do is take DN, so they keep their units in the Force Pool.
There is still one more unit the Axis wants to place, and that's the Supply Convoy unit, which goes in the Convoy box. Note that the Allies have a notional convoy unit in the box already due to the North Sea having a lot of shipping going on by the Brits to supply their units in France. Having an Axis support unit On Station in the North Sea Zone would not have changed anything as all that the Axis had left was Air units and they could not close the Open Ports in either Great Britain or in France. We use a supply convoy because we will be using the Airborne unit to capture Oslo and it will need to be in supply.
Because we will need to have the Airborne unit Blitz-Enabled, we place the marker in Copenhagen in anticipation of the Airborne unit being where we'll need it.

Next up is the Organizational Segment. Of the five steps in this segment, the only one of any interest at this time is Combination, and even that isn't too critical, but we might as well do it now. I combine the two infantry steps in Munich to form the Sou HQ at the two step level, but I decline to build up the two stacks of three one-step infantry just west of Kassel and in Frankfurt. Why? Because right now I have my weaker infantry units in the pool, but by the time I invade France I will have two stronger infantry units and there's no point in combining and then breaking down for now. There is very little chance of the French attacking me, they simply don't have the units to do so and cannot declare war on BH anyway because we are in Limited War. I really didn't even need to combine the infantry for the Sou HQ, but we will want it for the attack into France so I might as well get it started, and it will function as a placement point for replacements too. I will not show a picture as so little has changed on the map.
 On to movement! There are really only a couple of things we need to get into place for movement, both of which are intended to conquer DN this turn. First, we move the 1Flg Airborne unit to the northern tip of the Danish peninsula in anticipation of dropping it during Blitz combat. Next we take the 1-2-3 inf in Kiel and move it via rail to Copenhagen. Note that because this is a Connected strait we move at the road/rail rate and arrive in Copenhagen with no problems. For now, we'll leave all of the other units where they are other than moving the Sou HQ unit to Nurnberg. This picture shows the units in Denmark getting ready to move into Norway. Note that the troop Convoy unit should be a Supply Convoy for reasons that will be clear shortly.
Next up is the Blitz Combat Phase. The first step in this phase is where we flip over the Airborne unit to the Airdrop marker side. Note that only the Airborne and the one-step inf in Copenhagen are Blitz Enabled, but we really only need the Airborne enabled for this turn. We do the Airdrop step by flipping the counter to it's Airdrop Marker side (the marker part is important), then we move it two hexes to Stavanger. Note that this path can't go over a Prohibited hex, which would be Prohibited to a ground unit, but because this is a marker we can do it. What we could not do is trace through a Neutral country, such as Sweden.
There is no Blitz combat as no enabled units are in a position to fight. However, we will perform the Airdrop Landing step, and we will see why it was important to have a supply convoy in the North Sea. In order to perform an Airdrop Landing successfully, the Airdrop marker must be supplied and not stacked with an enemy unit. Because an Airdrop marker in a port qualifies it as an Open Port and we have a Supply Convoy running in the North Sea, the marker is supplied. It is removed to the Delay Box, and replaced with a one-step infantry unit from the Force Pool. We have no regular combat, so we move straight to the Reserve Movement Phase.
Since we don't want the Brits putting the DN Res unit in Oslo and would much rather just conquer the joint already, we move the one-stepper in Stavanger to Oslo via the rail. Note that during Reserve Movement, the unit would not get the increased road/rail rate because DN is still an Active enemy country. At this point, DN is not yet conquered. Just because, we also move the Sou HQ from Nurnberg to Kassel.
At this point, we are at the Final Admin Phase. The Axis doesn't want the West futzing with the BH units just yet, so while they could declare war they choose not to. This leaves the Conditional Event Phase, and while there are no conditional events on the Option Card, there is one "permanent" conditional event that we can execute and that's Allied Minor Conquest. 16.1.1 lays this out fully, but the essence is that the West puts the DN Res unit and country marker into the Western Conquered Minor Countries Box on their Force Pool. Because there are no Brit "colonial" units for DN, the West doesn't get any of these units. Also, no lands become ceded as a result of this conquest, so DN is now officially conquered rather than active. Note that even though the Axis took a strategic hex in Oslo, the VP won't change for a couple of turns. This is the only conditional event, so that's it for the Axis.
Here is the final position on the map at the end of the Axis Player Turn. Again, the Troop Convoy should be on it's Supply Convoy side.

The next installment will include the action through the end of Apr-May, as little will happen compared to this player turn.
4 comments:
Fantastic write-up. I was really on the fence about this game and now will absolutely be getting a copy. Thanks a ton for taking the time to put these blog entries together!
I'm glad you're enjoying it. Just going through this exercise, including documenting the experience, has been a great learning tool for me.
The rules are very complete, but they can be spread out a bit. I am *not* using the Support Unit cheat sheet supplied with the game, and I recommend strongly that you do so because I've spent considerable time going back and forth between the various definitions of things like Naval Bases and Open Ports and the rest of the rules, and the cheat sheet includes these.
Great write-up, but one small correction -- the Operation Weserubung card allows you to Declare War on a Minor Country OR roll on the Diplomatic Incident Table. You don't do both.
Rolling on the Diplomatic Incident Table is a gamble. With your Neutrality result, Denmark-Norway would NOT be at war, so Germany wouldn't have been able to invade it. Thus, the Axis player will usually choose to Declare War on a minor outright at this point in the game.
Thanks for the correction, Thomas. I have altered the blog to reflect the correct rules. Completely agreed about the use of the card in this scenario, that it's a no-brainer to Declare War rather than roll, with the only real cost being the Delay Roll on the airborne unit. In a campaign game, this card may be used for a variety of uses, but here the opening is intended to be scripted to history for learning purposes.
Post a Comment